The following code section indicates the creation of the virtual network based on the variables. It is important to note that there is a dependsOn field, which means that to create the resources, it requires another resource to be created first, in this case, the NSG:
},
{
“type”: “Microsoft.Network/virtualNetworks”,
“apiVersion”: “2021-02-01”,
“name”: “[variables(‘virtualNetworkName’)]”,
“location”: “[parameters(‘location’)]”,
“properties”: {
“addressSpace”: {
“addressPrefixes”: [
“[variables(‘addressPrefix’)]”
]
}
}
},
{
“type”: “Microsoft.Network/virtualNetworks/subnets”,
“apiVersion”: “2021-02-01”,
“name”: “[format(‘{0}/{1}’,
variables(‘virtualNetworkName’), variables(‘subnetName’))]”,
“properties”: {
“addressPrefix”: “[variables(‘subnetPrefix’)]”,
“networkSecurityGroup”: {
“id”: “[resourceId(‘Microsoft. Network/networkSecurityGroups’, variables(‘networkSecurityGroupName’))]”
}
},
“dependsOn”: [
“[resourceId(‘Microsoft.Network/networkSecurityGroups’, variables(‘networkSecurityGroupName’))]”,
“[resourceId(‘Microsoft.Network/virtualNetworks’, variables(‘virtualNetworkName’))]”
]
},
The following code section indicates the creation of the VM network interface card (NIC) with the variable values:
{
“type”: “Microsoft.Network/networkInterfaces”,
“apiVersion”: “2021-02-01”,
“name”: “[variables(‘nicName’)]”,
“location”: “[parameters(‘location’)]”,
“properties”: {
“ipConfigurations”: [
{
“name”: “ipconfig1”,
“properties”: {
“privateIPAllocationMethod”: “Dynamic”,
“publicIPAddress”: {
“id”: “[resourceId(‘Microsoft.Network/ publicIPAddresses’, parameters(‘publicIpName’))]”
},
“subnet”: {
“id”: “[resourceId(‘Microsoft.Network/ virtualNetworks/subnets’, variables(‘virtualNetworkName’), variables(‘subnetName’))]”
}
}
}
]
},
The following code section indicates the creation of the VM based on the variables declared in this script, which include vmSize, computerName, adminUsername, and
adminPassword:
“dependsOn”: [
“[resourceId(‘Microsoft.Network/publicIPAddresses’,
parameters(‘publicIpName’))]”,
“[resourceId(‘Microsoft.Network/virtualNetworks/ subnets’, variables(‘virtualNetworkName’), variables(‘subnetName’))]”
]
},
{
“type”: “Microsoft.Compute/virtualMachines”,
“apiVersion”: “2021-03-01”,
“name”: “[parameters(‘vmName’)]”,
“location”: “[parameters(‘location’)]”,
“properties”: {
“hardwareProfile”: {
“vmSize”: “[parameters(‘vmSize’)]”
},
“osProfile”: {
“computerName”: “[parameters(‘vmName’)]”,
“adminUsername”: “[parameters(‘adminUsername’)]”,
“adminPassword”: “[parameters(‘adminPassword’)]”
},
“storageProfile”: {
“imageReference”: {
“publisher”: “MicrosoftWindowsServer”,
“offer”: “WindowsServer”,
“sku”: “[parameters(‘OSVersion’)]”,
“version”: “latest”
},
The following code section indicates the creation of the VM and specifies the OS type for the OS disk along with a secondary disk size of 1023 GB:
“osDisk”: {
“createOption”: “FromImage”,
“managedDisk”: {
“storageAccountType”: “StandardSSD_LRS”
}
},
“dataDisks”: [
{
“diskSizeGB”: 1023,
“lun”: 0,
“createOption”: “Empty”
}
]
},
The following code section indicates the virtual network that the VM is going to be a part of based on the variables declared. To do this, the VM is dependent on the NIC being created along with a storage account:
“networkProfile”: {
“networkInterfaces”: [
{
“id”: “[resourceId(‘Microsoft.Network/ networkInterfaces’, variables(‘nicName’))]”
}
]
},
“diagnosticsProfile”: {
“bootDiagnostics”: {
“enabled”: true,
“storageUri”: “[reference(resourceId(‘Microsoft. Storage/storageAccounts’, variables(‘storageAccountName’))). primaryEndpoints.blob]”
}
}
},
“dependsOn”: [
“[resourceId(‘Microsoft.Network/networkInterfaces’, variables(‘nicName’))]”,
“[resourceId(‘Microsoft.Storage/storageAccounts’, variables(‘storageAccountName’))]”
]
}
The following code section indicates the variables such as the admin username, password, and DNS label:
],
“outputs”: {
“hostname”: {
“type”: “string”,
“value”: “[reference(resourceId(‘Microsoft.Network/ publicIPAddresses’, parameters(‘publicIpName’))).dnsSettings. fqdn]”
}
}
}
The following is the accompanying parameters file for the ARM template:
{
“$schema”: “https://schema.management.azure.com/ schemas/2019-04-01/deploymentParameters.json#”,
“contentVersion”: “1.0.0.0”,
“parameters”: {
“adminUsername”: {
“value”: “administrator”
},
“adminPassword”: {
“value”: “MyPasswordIslong!”
},
“dnsLabelPrefix”: {
“value”: “packt-demo-server”
},
The following code section indicates the variables such as the public IP address type and
SKU, OS version, VM size and name, and also the location of resources to be deployed:
“publicIpName”: {
“value”: “myPublicIP”
},
“publicIPAllocationMethod”: {
“value”: “Dynamic”
},
“publicIpSku”: {
“value”: “Basic”
},
“OSVersion”: {
“value”: “2019-Datacenter”
},
“vmSize”: {
“value”: “Standard_D2_v3”
},
“location”: {
“value”: “northeurope”
},
“vmName”: {
“value”: “demo-server”
}
}
}
Next, let’s focus on the VHD section from the main template file. The screenshot in
Figure 9.4 represents information such as the following:
- osDisk: This is where we specify the OS disk; we have chosen to create the OS disk from an image within the Azure gallery and store it as a managed disk.
- dataDisks: This is where we specify the additional storage disk, which will be 1 TB in size and will be empty (formatted drive).
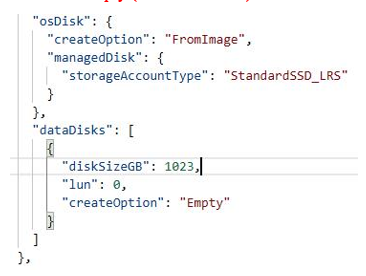
Figure 9.4 – VHD ARM template
In this section, we had a look at the ARM template, which showed how to configure several resources including a virtual hard disk for the OS and an additional VHD. We encourage you to read up further by using the following links based on Azure ARM templates:
Next, we are going to look at how to deploy from an ARM template via the Azure portal.