The following PowerShell code creates and configures the Azure VM. It will also create an Network Security Group (NSG) associated with the VM network interface and allow remote desktop (RDP) access:
## Set credentials for server admin and password. ## $adminUsername = ‘Student’
$adminPassword = ‘Pa55w.rd1234’
$adminCreds = New-Object PSCredential $adminUsername,
($adminPassword | ConvertTo-SecureString -AsPlainText -Force) $OperatingSystemParameters = @{
PublisherName = ‘MicrosoftWindowsServer’ Offer = ‘WindowsServer’ Skus = ‘2019-Datacenter’
Version = ‘latest’
}
$vmName = “myVM”
$vmSize = “Standard_DS1_v2”
$NSGName = “$vmName-nsg”
$subnetid = (Get-AzVirtualNetworkSubnetConfig -Name ‘myBackendSubnet’ -VirtualNetwork $vnet).Id
$nsg = New-AzNetworkSecurityGroup -ResourceGroupName
“$ResourceGroup1” -Location “$Location” -Name “$NSGName”
$nsgParams = @{
‘Name’ = ‘allowRDP’
‘NetworkSecurityGroup’ = $NSG
‘Protocol’ = ‘TCP’
‘Direction’ = ‘Inbound’
‘Priority’ = 200
‘SourceAddressPrefix’ = ‘*’
‘SourcePortRange’ = ‘*’
‘DestinationAddressPrefix’ = ‘*’
‘DestinationPortRange’ = 3389
‘Access’ = ‘Allow’
}
Add-AzNetworkSecurityRuleConfig @nsgParams | Set-AzNetworkSecurityGroup
$pip = New-AzPublicIpAddress -Name “$vmName-ip”
-ResourceGroupName “$ResourceGroup1” -Location “$Location”
-AllocationMethod Dynamic
$nic = New-AzNetworkInterface -Name “$($vmName)$(Get-
Random)” -ResourceGroupName “$ResourceGroup1” -Location
“$Location” -SubnetId $subnetid -PublicIpAddressId $pip.Id
-NetworkSecurityGroupId $nsg.Id
$vmConfig = New-AzVMConfig -VMName $vmName -VMSize $vmSize Add-AzVMNetworkInterface -VM $vmConfig -Id $nic.Id
Set-AzVMOperatingSystem -VM $vmConfig -Windows -ComputerName $vmName -Credential $adminCreds
Set-AzVMSourceImage -VM $vmConfig @OperatingSystemParameters
Set-AzVMOSDisk -VM $vmConfig -Name “$($vmName)_OsDisk_1_$(Get-Random)” -CreateOption fromImage
Set-AzVMBootDiagnostic -VM $vmConfig -Disable
## Create the virtual machine ##
New-AzVM -ResourceGroupName “$ResourceGroup1” -Location “$Location” -VM $vmConfig
Task six: Deploy a private endpoint to the storage account.
The following PowerShell code creates a private endpoint and associates this with the storage account we created earlier:
$storageAccount = Get-AzStorageAccount -ResourceGroupName $resourceGroup1 -Name $storageAccountName1
$privateEndpointConnection = New-AzPrivateLinkServiceConnection -Name ‘myConnection’ -PrivateLinkServiceId ($storageAccount.Id) -GroupId ‘file’;
## Disable private endpoint network policy ##
$vnet.Subnets[0].PrivateEndpointNetworkPolicies=”Disabled”
$vnet | Set-AzVirtualNetwork
## Create private endpoint
New-AzPrivateEndpoint -ResourceGroupName “$resourceGroup1” -Name “myPrivateEndpoint” -Location “$Location” -Subnet ($vnet.Subnets[0]) -PrivateLinkServiceConnection $privateEndpointConnection
Task seven: Test connectivity from the server to the file share over the local IP address.
Follow the following steps to check connectivity to the file share:
- Log in to the server we created in task five using the credentials you specified. In the Azure portal, navigate to the VM and click Connect, and then click RDP. Click Download RDP file on the screen that follows:
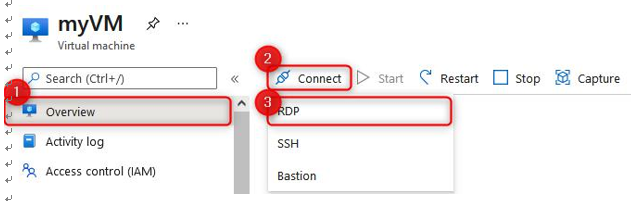
Figure 8.8 – Connect to a VM
Enter the credentials for the VM.
- Open the file explorer and click This PCon the left navigation menu. Click Computer on the top menu bar and then click Map network drive:

Figure 8.9 – Mapping the network drive
- Choose a Drive letter and enter the IP address and share (10.0.0.5 if following along as per the lab) in the Folder input, such as \10.0.0.5\az104-07-share, click on Connect using different credentials, and then click Finish:

Figure 8.10 – Selecting the folder path
- For the credentials, enter the storage account name as the username, and then you will need to navigate to the storage account in Azure and use the storage account key as the password. Click Remember my credentials and then OK:
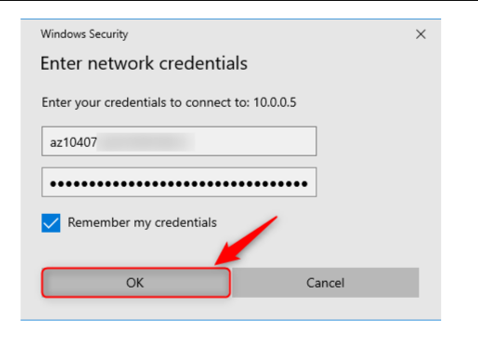
Figure 8.11 – Enter storage account credentials
You have now mapped the network share. This has been connected over the private endpoint. You can test whether it is functional by uploading a file.
The lab is completed; you can now remove all the associated resources for the lab.
Note
It is best practice to remove unused resources to ensure that there are no unexpected costs, even though resources created in this lab do not incur additional costs.
This brings us tothe end of labs for Chapter 6, Understanding and Managing Storage, and Chapter 7, Securing Storage.
Summary
In this chapter, we had a look at scenario-based labs, which tested our skills in the following areas: managing Azure storage, creating an Azure function with AzCopy for replication, connecting storage to a private endpoint, and proving our deployments and configurations.
In the next part of the book, we’ll cover the deployment and management of Azure compute resources. We will explore VMs, automation of VM deployments using Azure Resource Manager (ARM) templates, containers, and app services.