Copying data between containers using AzCopy
We will now demonstrate a similar copy task to the previous section except this time, you will be copying data from a source container on a storage account to a destination container on the same storage account. Note that this technique can also be used across storage accounts as the principle is the same. Follow these steps:
- Navigate to the Azure portal by opening https://portal.azure.com.
- Select a storage account and create two containers on the storage account, one named azcopysource and the other azcopydestination. These can be any name you choose should you want to implement this again later for other environments, just remember to update these names in your copy script.
- On the left menu for the storage account, clickContainers under the Data storage context, then click on the azcopysource container. Click Shared access tokens under the Settings context on the left menu. Create a new SAS key by setting Permissions to Read and List, setting time for Start to 5 minutes from your current time, and then clicking Generate SAS token and URL. Copy the SAS token – you are only ever presented with this once. Perform the same operation for the destination container. This time, set theShared access tokens permissions to Read, Add, Create, Write, Delete, and List.
- The following script will copy the files from the source container, azcopysource to the destination container, azcopydestination. Note the extra switches (flags) used by the following script. –overwrite=ifsourcenewer performs the operation of overwriting files on the destination if the source files are newer. The –recursive flag recursively copies data from the source container and subsequent folders on any filesystem you copy from, essentially copying all the files and folders it finds:
Change all Variables Below
$StorageAccountName = “az104chap7acc06082021”
$SrcContainerName = “azcopysource”
$DestContainerName = “azcopydestination”
$SourceSASToken = “sp=rxxxxxxxxxxxxxxxxxxxxxxxxxxxxxx%3D”
$DestSASToken = “sp=rxxxxxxxxxxxxxxxxxxxxxxxxxxxxxx%3D”
#Run AzCopy Command
./azcopy.exe copy “https://$StorageAccountName.blob. core.windows.net/$($SrcContainerName)?$SourceSASToken” “https://$StorageAccountName.blob.core.windows. net/$($DestContainerName)?$DestSASToken” –overwrite=ifsourcenewer –recursive
- After running the preceding script, you will notice text such as this appear indicating that a file copy operation has been completed:
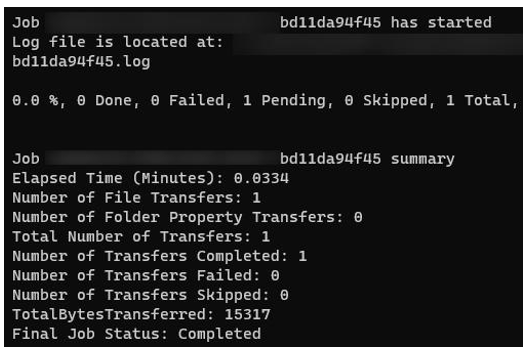
Figure 7.24 – AzCopy script run
You have just learned how to copy data between containers using AzCopy, which brings us to the end of this section, where we have learned what AzCopy is, how to download it, how it works, and also how to copy data between different containers. In the next section, we have provided additional reading material for you to learn more if desired.